Let’s get straight to the point: if the temperature of your urine sample is wrong, you fail. It doesn’t matter if the metabolites are below the cutoff; the lab checks the temperature first. It’s the quickest, easiest way for them to spot a substituted or tampered sample. That’s why the question “how long does urine stay warm between your legs” isn’t just a curiosity—it’s the critical variable that determines your outcome. The Reddit community advice on urine warmth consistently circles this fact: temperature is everything. Whether you’re using your own diluted sample or another method, understanding the precise duration urine stays at the right temperature is non-negotiable. This guide breaks down the exact protocol, from the moment you collect the sample to the second you hand it over, so you can control that variable and avoid an automatic, technical failure.
The Acceptable Urine Temperature Range and How Labs Test It
Alright, so we’ve established that temperature is the make-or-break variable. Now let’s get into the exact numbers and the procedure you’re up against. This isn’t a guess or a suggestion; it’s a hard protocol.
The acceptable urine temperature range for a valid drug test specimen is 90°F to 100°F (32°C to 38°C). That’s the official window. Now, if you’re asking “what temperature should urine be” for the best chance of passing without a second glance, the ideal target is the higher end of that, 94°F to 100°F. This range exists for one reason: it’s designed to mimic what temperature is fresh human urine when it leaves the body. Normal body temperature hovers around 98.6°F, and fresh urine is essentially at that core temperature.
Here’s the lab’s first move, and it’s fast. Within four minutes of you handing over that cup, the collector will check the temperature. They don’t use a fancy thermometer stuck in the liquid. Instead, there’s a temperature strip—a line of heat-sensitive squares—on the side of the collection cup. The collector reads the color change on that strip. It’s the first and fastest validity check in the entire process.
Think of it as a security filter. If your sample is outside that 90-100°F range, it’s an automatic red flag. Below 90°F suggests the urine was stored, cooled, or substituted. Above 100°F suggests it was artificially heated. Either way, it gives them immediate reason to believe the specimen was altered. That single reading can trigger a refusal right there at the collection site, forcing you into a directly observed collection or a failed test.
So, the protocol is simple but strict: your sample has to hit that 90-100°F window within four minutes of you producing it. The logic is simple—fresh urine from a body is warm. If it’s not, the system assumes something is wrong.
This leads to the obvious next question, doesn’t it? If the lab checks so quickly, how fast does urine actually cool down once it’s out? That timeline is the next critical piece of the puzzle.
How Quickly Urine Cools After Collection: A Practical Timeline
Alright, so you’re asking the right question: how fast does this actually happen? Let’s break down the timeline you’re up against.
Here’s the core estimate: urine in a standard, non-insulated container—think a small plastic pill bottle—sitting at room temperature will drop below that critical 90°F mark in about 15 to 30 minutes. That’s your window. The cooling isn’t gradual in a slow, predictable way; it’s a rapid slide. Once the sample leaves the body, it can cool at a rate of 1 to 2 degrees Fahrenheit per minute just sitting in the ambient air of a bathroom or waiting room.
Now, that 15-30 minute estimate has variables. The biggest factors that speed up this cooling process are:
- Container Material and Insulation: A thin plastic pill bottle offers almost no insulation. It’s like holding a warm drink in a paper cup—it loses heat fast. Metal containers, if you were to use one, would cool the sample even quicker.
- Sample Volume: A smaller amount of liquid, say two ounces, has less thermal mass. It will cool down significantly faster than a larger volume because there’s simply less “warmth” to lose.
- Ambient Temperature: A cold bathroom or a drafty waiting room will pull heat from the sample much more rapidly than a warm, humid environment.
This is why relying solely on the initial warmth is a shoddy scenario. You have to account for wait times, travel, and the procedure itself.
This is where the idea of using your own body heat comes in. It’s a primary method for a reason. Tucking that sample against your skin—between the thighs, in the groin area, or snug against the waistband—can use your core body temperature, which sits around 98.6°F, as a living heat source. In ideal conditions, body heat placement can maintain the temperature for 30 to 60 minutes.
But here’s the caveat, and it’s a big one: body heat alone is often insufficient for the full duration of your visit. Its effectiveness varies wildly based on your individual body temperature, how the container is secured, and the external environment. It’s a buffer, not a guarantee. You’re fighting basic physics, and the clock starts the second the sample is prepared. Understanding this rapid cooling timeline is what makes knowing how to keep urine warm for a drug test not just helpful, but absolutely essential. The problem is set; now we need to solve it.
Step 1: Choosing the Right Container and Preparing Your Sample
Alright, so we’ve established the problem: that sample is cooling down the second it leaves the body. Now, we start building the solution, and it all begins with the vessel. Think of it like this—if you’re going to try to keep a drink hot, you wouldn’t put it in a leaky cup with no lid. Same principle applies here, but the stakes are a lot higher.
The absolute foundation for every temperature control method we’ll discuss is starting with the right container. You need a clean, sealable container. I cannot stress the “clean” and “sealable” part enough. A fantastic, low-profile option is a small plastic pill bottle with one of those secure scroll-top lids. It’s designed to be airtight, it’s durable, and it’s easy to handle.
Here are the best practices. First, make sure the bottle is brand new or has been thoroughly washed and is completely dry inside. Any residual moisture or soap can contaminate the specimen and throw off the test. Second, if you’re using another person’s urine—and this is a critical variable—you need to collect it as close to your test time as physically possible. The fresher it is, the closer it is to the right temperature range to begin with.
You’re aiming for a minimum volume of 30 to 45 milliliters, which is what a standard test requires. Some containers, like 50ml mixing vials or specific transport tubes, are built for this and often come with secure, sometimes flip-top caps that allow for one-handed, leak-free pouring. Getting this first step right isn’t just a tip; it’s the protocol that makes all the subsequent steps for keeping it warm even possible.
Step 2: Warming Methods—Body Heat, Hand Warmers, and Heat Activator Powder
Alright, so you’ve got your sample secured in the right container. Now, the next critical variable is bringing that sample up to—and keeping it within—that narrow acceptable temperature window. We’re talking about the 90°F to 100°F range, though the federally accepted sweet spot for a valid specimen is really 94°F to 100°F. Let’s break down the manual methods to get this done, starting with the simplest.
Method 1: Your Own Body Heat
This is the most discreet protocol because it requires no external devices. The idea is to use your body as a steady, low-power heater.
- Placement: The goal is maximum skin contact on a warm part of your body. The groin area, tucked tightly against the inner thigh or within snug underwear, is the most effective site because it’s closest to your core temperature. The underarm is another option, good for a quick temporary boost, but it’s less stable for moving around.
- Process: Simply secure the sealed container against your skin. Using tight-fitting underwear (“whitey-tighties” work well) or even a snug sock for insulation can help retain the heat.
- Time Estimate: If your sample is starting cold, it can take a significant amount of time—potentially up to 45 minutes—to bring it into the 90-100°F range using body heat alone. Once warm, body contact can typically maintain the temperature for about 30 to 60 minutes, depending on your body temp and the environment.
- The Pro: It’s silent, requires no purchases, and is the hardest method to detect.
- The Con: It’s slow to heat and less reliable for long durations or in cool environments. The temperature can drop below 90°F after just a few minutes of poor contact.
Method 2: Hand Warmers or Heating Pads
These provide active, portable heat. A key point: standard chemical hand warmers (like HotHands) are a major risk. They can reach 130°F to 160°F+, which will absolutely cook your sample and ruin it. You need a specialized heating pad designed for this purpose.
- Activation & Placement: Activate the pad 30-45 minutes before your test to let it reach a stable temperature. Secure it to the outside of your container with a rubber band or tape. Crucially, avoid direct, prolonged contact between the heater and the container—use a layer of cloth or a sock as a buffer to prevent hot spots that can overheat the sample.
- Duration: A quality, specialized pad can maintain temperature for hours. Combined with body heat and insulation, this method can keep a sample warm for up to 6 hours in some scenarios.
- The Pro: Provides reliable, active heat that’s more consistent than body heat alone, especially during transport.
- The Con: There’s a real risk of overheating if the pad is too hot or left in direct contact. You must monitor the temperature strip.
Method 3: Heat Activator Powder (The Advanced Option)
This is a chemical additive—a powder that creates an exothermic reaction when it hits liquid, raising the temperature in seconds. Think of it as an emergency rescue tool, not your primary heater.
- Protocol: This is all about precision. You add only a tiny amount—about 1/4 to 1/3 of the vial at most. Cap the container, gently swirl for 10-15 seconds, then wait 15-20 seconds for the reaction to finish before checking the strip.
- Critical Warning: The single most common error is adding too much. The reaction is irreversible and can spike the temperature above 100°F within moments. A sample submitted over 100°F is considered invalid per federal guidelines and can trigger a observed re-collection. If you overshoot, your only option is to wait 3-5 minutes for it to cool naturally.
- Pro Strategy: Use a microwave at home to get the sample to ~90°F, attach a heat pad for travel, then use a minuscule pinch of powder in the test facility’s parking lot or restroom to bump it precisely into the 96°F-98°F range.
- The Pro: Offers rapid, pinpoint adjustment for last-minute scenarios with no microwave access.
- The Con: High risk. It’s easy to misuse and overheat your sample irreversibly.
A note on reheating: if you’re using synthetic urine, you might wonder, can you reheat synthetic urine multiple times? The general guidance is to avoid repeated thermal stress. How long does synthetic urine stay warm once heated? Without aid, maybe 30-60 minutes. With these methods, you can extend that significantly. But reheating a cooled sample multiple times can potentially degrade its composition, so it’s best prepared fresh for the test day.
All of these methods can work, but they all share one common requirement: careful, accurate monitoring. Getting the temperature into the right zone is only half the battle; you have to verify it’s there at the exact moment you pour. That’s the next essential step.
Step 3: Reading Temperature Strips and Troubleshooting Common Issues
Alright, so you’ve got your sample warmed up using one of the methods we just discussed. Now comes the moment of truth, the scenario that causes a lot of anxiety: is it actually in the right zone? This is where your synthetic urine temperature strip becomes the most critical tool in your kit. Misreading this or having a faulty strip is a common reason for an automatic fail, so let’s break down exactly how to use it and what to do if things go sideways.
How a Temperature Strip Works & Where to Put It
First, understand the variable you’re dealing with. Most strips attached to synthetic urine bottles use heat-sensitive liquid crystals. They change color—usually to a bright green—to indicate the temperature of the surface they’re touching. The key protocol is to check this strip immediately before you pour the sample into the collection cup.
Placement is everything. If you’re using a urine bottle with a built-in temperature strip, it’s already in the correct spot. If you’re applying a stick-on strip yourself, attach it directly to the bottle, ideally on the side opposite where you place your heat source (like a hand warmer). Why? If the heat pad is pressed directly against the strip, it can give a reading 2–4°F higher than the actual liquid temperature inside, which is a major variable that could lead to an invalid result.
Reading It Accurately: The Green Means Go
When you look at the strip, you’re looking for that green indicator to fall within the acceptable range. The general, safe target is between 94°F and 100°F. If the strip is all black with no green showing, don’t panic and assume it’s broken. In almost every case, a “blank strip” means your sample is too hot, likely over 100°F. The protocol here is simple: let it cool down for a minute or two and check again.
If the green is present but sitting below the 94°F mark, your sample is too cool. This is where you need a quick corrective action.
Troubleshooting Common Issues: Too Hot, Too Cold, or Strip Failure
Let’s run through the main problems and their solutions.
- If the sample is too cool: Your estimate is that it needs a quick boost. Use a brief burst of direct body heat—hold it tightly in your hand or under your armpit for 60-90 seconds. If you have an activated heat pad, make sure it’s secured to the bottle. Recheck the strip.
- If the sample is too hot (blank strip): Cool it by waving the container gently in the open air. Do not put it in water or a refrigerator, as that can cool it too rapidly or unevenly. The goal is a gradual drop back into the green zone.
- If the strip appears faulty, damaged, or is just too hard to read: This is a legitimate concern. Strips can sometimes rub off against clothing or become illegible. Your best backup plan is to perform a check with a separate, reliable digital thermometer if you have access to one. This is your contingency for a faulty built-in strip.
Where to Find Temperature Strips & Final Caveats
If you need to buy temperature strips for urine separately, you can often find them at local head shops, some pharmacies with medical supply sections, or specialty online retailers. Searching for “temperature strips for urine near me” might yield local options, but calling ahead is a smart estimate to save time.
Remember, the strip measures surface temperature. To ensure that reading correlates with the core liquid temperature, give the bottle a gentle shake before checking. Also, be mindful of environmental factors—if you’re in a cold car or a heavily air-conditioned waiting room, the sample will cool faster, requiring more frequent rechecks right up until you enter the restroom.
Mastering this step removes the biggest guesswork from the procedure. But getting the temperature right is only one part of the equation. You also have to consider the composition of the sample itself to avoid another common flag: the “diluted” or “invalid” result. That’s the next layer of complexity we need to address.
Step 4: Transporting Your Sample and Managing Wait Times
Alright, so you’ve got your sample prepared and at the correct temperature. Now comes the real-world test: getting it to the facility and dealing with the inevitable wait. This is where a lot of plans fall apart, so let’s walk through the protocol for keeping everything secure and within that 90-100°F window until the moment you pour.
The Concealment and Transport Protocol
First, understand the site’s procedure. You’ll likely have to remove jackets and leave bags outside. They will make you empty your pockets. This means your sample must be on your body, in a spot that is both insulating and never searched during a standard, non-observed test. For the vast majority of scenarios, that spot is your groin area.
Your body heat, which sits around 96-98°F, is your primary and most reliable heat source. The goal is to press the sample directly against your skin. Here’s how to do it based on your build and what you’re wearing:
- For Men (The Crotch Tuck): Wear tight compression shorts. Position the bottle flat against your perineum with the temperature strip facing your body. Then, wear loose-fitting pants over them. This method works well for most body types.
- For Women (Crotch or Alternatives): Snug, high-waisted underwear or specialized “stash” panties can hold a bottle vertically against the inner thigh or horizontally across the pubic area. An alternative is the sports bra method—tucking a small bottle into the front center of a tight sports bra. Just know that your chest runs a few degrees cooler than your groin, so it’s a slightly riskier variable.
- Specialized Gear: Stash boxer briefs for men or stash underwear for women have built-in pockets that keep the bottle directly against skin. A stash leg belt—an elastic band worn around the upper inner thigh—can also work, but may be less secure on very slim builds.
If you’re in a cold climate, your car is a danger zone. Do not leave the sample in the car while you go in. The temperature will plummet. Keep it concealed on your person from the moment you leave your house.
Managing the Waiting Room: A Game of Patience
Average wait times can be 15 to 45 minutes, but delays of 60-90 minutes are common. This is the scenario your heat pad is for. A key point: time the activation of your hand warmer or heat pad so it reaches its peak temperature during your anticipated wait, not hours before. If you activate it at home and your test is two hours later, you risk it cooling down right when you need it most.
Once you’re in the waiting room, the rule is simple: be a statue. Do not fidget. Do not repeatedly reach toward your crotch—it draws eyes. If you need to adjust, use the facility’s bathroom. You can cross your legs gently to increase pressure and insulation, but don’t do it so aggressively that you dislodge the bottle.
Your last line of defense is a final, discreet temperature check. Before you tell the collector you’re ready, use the restroom one last time. Check the strip. If it’s below 94°F, this is your only window. If you’re using a product with heat activator powder, carry a tiny amount separately. Add a small pinch (1/8 to 1/4), swirl gently for 10-15 seconds, and recheck. This is a precise adjustment, not a first-line heating method.
If you’re facing a long wait in a cold building, you can drape your jacket over your lap for extra insulation. But do not, under any circumstances, remove or try to reattach a heat pad once it’s activated and in place.
Executing this transport and wait-time protocol is what separates a successful test from a failed one. It’s all about controlling the variables you can—location, insulation, and timing. Some commercial kits are designed specifically to simplify this entire step, with integrated heating systems and concealment gear built for these exact scenarios.
The 10-Minute Pre-Entry Temperature Checklist
All right, you’re in the parking lot. The test is minutes away. This is the final, critical verification. Think of this like a pilot’s pre-flight checklist—every item is non-negotiable. Skipping one step introduces a variable that could invalidate everything you’ve prepared. Let’s run through it.
1. Confirm the Temperature Strip Reads 96–98°F.
This is your primary and most time-sensitive check. The acceptable submission range is 90–100°F, but you are not aiming for the middle. You are aiming for 96–98°F. Why the buffer? Because from the moment you check it to the moment the collector checks it, the sample will cool. The estimate is a drop of roughly 1°F every 2–3 minutes in a room-temperature environment. The protocol states the collector must verify the temperature within 4 minutes of donation. If your strip reads 96°F now, you have a comfortable margin for that transfer and hand-off. If it reads 99°F or 100°F, you are cutting it close—it might cool into range, or it might be flagged as too warm. If it’s below 96°F, you have a problem that requires immediate, discreet correction, which is a high-risk scenario. Your target is that 96–98°F window.
2. Inspect the Container’s Seal for Moisture or Leaks.
Run your finger around the seal and the spout area. The goal is to ensure it’s completely dry. Here’s the scenario: if you’ve been carrying the bottle against your skin, especially in the groin area, sweat can accumulate. That moisture can compromise the seal or, worse, drip onto the temperature strip, making it unreadable. Also, check for any dye transfer from dark clothing. A blue or green smudge on the bottle neck is a red flag. Finally, if you used a heat activator powder, confirm it’s fully dissolved and give the spout a wipe. Any powder residue is a direct contaminant and a clear signal of tampering.
3. Verify the Heating Pad is Warm and Securely Attached.
Feel the opposite side of the bottle from the temperature strip—that’s where the heat pad should be. It should feel noticeably warm, not hot, and not cold. Remember, these pads require activation and a lead time, often 30 minutes or more, to reach and maintain their operational temperature. If it’s cold, it was likely activated too late or is a dud. If it’s scorching hot, you risk overheating the sample above 100°F. The pad must be firmly secured against the bottle. If it’s loose or shifting, its heating effect is unreliable. This is one of the most common failure points—insufficient warm-up time leading to a sample below 90°F.
4. Perform a ‘Movement Check’ for Silence and Stability.
Stand up outside your car. Walk a few paces. Sit back down. Stand up again. Your objective is to ensure the bottle stays locked in place and makes no noise. Listen for a sloshing sound or the click of a cap. The groin/crotch area is the preferred location because layers of clothing naturally mask the outline and muffle sound. Practice the movements you’ll make: walking to the door, sitting in a waiting room chair, standing up when called. Avoid crossing your legs aggressively once inside, as this can dislodge the bottle. If you’re using a belt-style kit, ensure the tube isn’t snagging on anything. This physical rehearsal is crucial to avoid an unnatural gait or the paranoid fidgeting that draws eyes.
5. Final Psychological Reset: Control Your Breathing.
Your heart is pounding. That’s normal. But elevated heart rate leads to sweating and, more importantly, the shakes. Uncontrollable hand tremors during the pour are a massive tell. So, right now, in your car, take three slow, deep breaths. In through the nose for a count of four, hold for four, out through the mouth for six. This isn’t mysticism; it’s physiology. You’re manually engaging your parasympathetic nervous system to lower your heart rate and calm the physical tremors. You need steady hands for the final step. The test is a procedure, and you are executing a protocol. Emotion is a variable you must control.
This checklist is your final gate. Each point addresses a specific, documented reason for failure. By methodically confirming each one, you shift the odds decisively in your favor. You’ve controlled the variables. Now, go in.
Consequences of Submitting a Sample Outside the Correct Temperature Range
Let’s talk about the worst-case scenario, because it’s the one that keeps you up at night. You’ve done everything right—maybe you even used one of the manual warming methods we just discussed. But you walk out of that clinic, and a week later, you get the call. You failed. Not because of metabolites, but because of a number on a form. Your sample was 89 degrees. Or 102. It doesn’t matter. The result is the same: an automatic, unquestioned failure.
Here’s the protocol, and it’s brutal in its simplicity. The collector has one job: to ensure the sample is valid before it even goes to the lab. The moment you hand over that cup, they check the temperature. The standard Labcorp drug test urine temperature range, and the one used by virtually every major facility, is 90 to 100 degrees Fahrenheit. If your sample is outside that window, the procedure stops right there.
The collector will note it directly on the custody and control form. Your test isn’t reported as “positive.” It’s reported as “invalid” or “adulterated.” In the eyes of the employer, probation officer, or medical review officer, this is often just as damning as a positive result. It screams tampering. It triggers all the same consequences—a rescinded job offer, a violation of probation—without the lab even needing to test for drugs. You fail the “eye test” before the real test even begins.
Do they actually check? Every single time. It’s step one of the collection protocol. A quick strip reading is non-negotiable. Search for failed drug test because of urine temperature stories on forums like Reddit, and you’ll find a graveyard of cautionary tales. People who used hand warmers that overheated the sample to 104. People whose body heat wasn’t enough, and it cooled to 88 in a cold waiting room. The stories are consistent: the temperature strip is a stickler, and the collector has no discretion. A number out of range is an automatic fail.
This is why every step in the previous checklist matters. This isn’t a minor detail; it’s the primary physical characteristic that validates your sample as human and fresh. Controlling this variable isn’t optional. It’s the entire ballgame.
Step 5: Synthetic Urine Kits with Built-In Temperature Control
All right, so you’ve just walked through a pretty detailed protocol. You’re managing a container, sourcing heat, monitoring a strip, and timing everything against a cooling curve that starts the second you have the sample. That’s a lot of variables to control under what is already a high-stress scenario. The anxiety doesn’t come from the steps themselves, but from the margin for error. What if the hand warmer is a dud? What if your body heat isn’t enough in a cold clinic? This is where the logic of a purpose-built system starts to make a lot of sense.
Think of it as moving from a manual transmission to an automatic. The core job—getting the sample to 90-100°F and keeping it there—is the same. But a dedicated synthetic urine kit with warmer is engineered to handle the hardest part of that job for you. These are all-in-one systems where the temperature management isn’t an afterthought; it’s integrated into the design from the ground up.
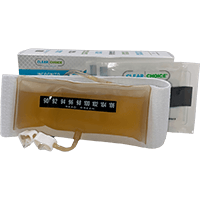
Let’s break down what that typically looks like. A proper fake urine kit will have a few key components designed to work together. You’ll have a container—often a flexible bladder bag or a sturdy bottle—pre-filled with the synthetic urine. Attached to that is the warming mechanism. This could be a simple, reliable adhesive heat pad that you activate and attach directly to the container. More advanced systems, like the Clear Choice Incognito Belt, take this a step further. It’s a gravity-fed system you wear discreetly against your body. The sample is held in a bag attached to a tube and a belt. Your own body heat provides a baseline warmth, and an included heat pad gives you that final, precise boost to hit the target range. The entire apparatus is designed around maintaining that critical temperature variable from the moment you prepare it until the moment you pour.
The other major component you’ll find integrated is the temperature monitoring. Instead of hoping a separate strip stays in contact or trying to read a tiny dot through clothing, these kits have integrated temperature strips built right onto the container. With a system like the Incognito Belt, you can often feel the temperature strip through the clothing, or discreetly check it with a quick glance, giving you a constant, real-time read without any extra steps.
Now, a different approach is found in a product like Quick Luck. This is a premium synthetic urine with heater that uses a heat activator powder. The kit includes a vial of this powder. The protocol here is different: you don’t use a microwave or a traditional heat pad. Instead, you add the powder to the sample in the container, and it creates an exothermic reaction, heating the liquid to the correct range very quickly. The container itself still has that built-in temperature strip so you know exactly when it’s ready. This method is particularly useful for unpredictable situations where you might not have access to a microwave or time to wait for a heat pad to warm up.
The core value proposition here is the reduction of guesswork. You’re not jury-rigging a system from separate parts. You’re using a system where the synthetic urine warmer, the container, and the temperature gauge are designed to function as a single unit. This directly addresses the primary anxiety point: the fear of the sample being the wrong temperature at the wrong moment. It turns a complex, multi-variable problem into a more managed, step-by-step process where the hardest technical challenge is largely automated for you.
Choosing the Right Method: Manual Techniques vs. Commercial Kits
So, you’ve got the basics of keeping a sample warm. Now we hit the real fork in the road: do you go the manual, do-it-yourself route, or do you invest in a commercial kit? This isn’t just about cost. It’s about weighing reliability, stress, and the specific scenario you’re walking into. Let’s break down the variables.
The Manual Route: Cheap but High-Stress
Going manual means piecing together your own system—using a microwave, body heat, and maybe some heat activator powder. The main appeal is cost. It’s significantly cheaper upfront.
- The Scenario: You’re at home, you have time to prepare, and the test is unsupervised.
- The Method: You’d use a microwave in short, 10-second bursts to get the sample to around 94°F, then rely on body heat or a hand warmer to maintain it. Heat activator powder can be a lifesaver for on-the-go adjustments, but it’s a variable that demands caution. The biggest risk here is user error. Overheating the sample above 100°F is the most common mistake, and there’s no quick fix—you just have to wait for it to cool, which can feel like an eternity when you’re in a parking lot.
- The Catch: You’re the technician. You’re managing the microwave, the thermometer, the powder, and the timing. For a lot of folks, that’s a heap of anxiety on top of an already stressful day. And if your test is supervised? This method is often a non-starter, as you can’t exactly fiddle with a bottle and powder under direct observation.
The Commercial Kit Route: An Investment in Reliability
This is where you pay for a pre-engineered system. Think of it less as buying a product and more as buying insurance against the variables.
- The Scenario: You face a random test with no microwave access, a supervised test, or you simply want to minimize the chance of a catastrophic error.
- The Solution: Kits like Quick Luck or the Incognito Belt are designed as all-in-one solutions. Quick Luck comes with a pre-mixed formula, a calibrated heat pad, and its own heat activator powder—everything is designed to work together. The formula is biocide-free, which is a key point, as some labs are starting to screen for those compounds. The Incognito Belt takes it further; it’s a wearable, gravity-fed system that uses body contact and a specialized heat pad to maintain temperature for over an hour, with a hands-free delivery tube that’s a game-changer for any test where you might be watched.
Let’s directly tackle the big objections:
- “But what about lab detection? I’ve heard they can tell.” This is a fair concern. Standard labs like Quest or LabCorp run Specimen Validity Testing (SVT) on every sample, checking for things like pH, creatinine, and specific gravity. Reputable commercial kits are formulated to match these human urine parameters. When users wonder can fake pee be detected, the answer often depends on the quality of the formula. The more advanced ones are also biocide-free to avoid newer oxidant screens. The risk isn’t usually in the lab “smelling” the sample; it’s in using a cheap, outdated formula that fails these chemical checks.
- “That’s expensive. Is it worth it?” Let’s frame this differently. What is the cost of failing? For many, it’s a lost job offer, a probation violation, or a black mark that means you can’t reapply for 6 to 12 months. When you look at it that way, a $90-$130 kit isn’t a purchase; it’s a strategic investment in your livelihood or your freedom. It’s the cost of removing the most significant variables from your control.
The bottom line: Manual methods can work if you have the time, privacy, and nerves of steel to execute perfectly. Commercial kits are for when you need to reduce the number of things that can go wrong. If your test is supervised, the Incognito Belt is the discreet, purpose-built tool for that job. If you’re a truck driver facing a random with no microwave in sight, Quick Luck with its heat activator powder gives you the control you need, right when you need it.
The choice ultimately hinges on your personal calculation of risk versus reward, and how much peace of mind is worth to you on test day.
Legal Risks and Safety Considerations You Should Understand
Alright, let’s talk about the other side of the coin—the potential fallout. I need to be straight with you here, because the stakes change dramatically depending on who is asking for your urine. Using synthetic urine to try and pass a test isn’t just a technical foul; in certain scenarios, it can be a legal or career-ending move. My goal here is to make sure you understand the variables so you can make an informed estimate of your own risk.
The most serious consequences are tied to federally regulated testing. If you’re facing a Department of Transportation (DOT) test or anything under SAMHSA guidelines, a lab detecting a substituted sample is treated exactly like a positive result—it’s officially a “refusal to test.” The protocol here is immediate. You’re pulled from safety-sensitive duties on the spot, and getting back requires a full Substance Abuse Professional evaluation and a strict follow-up testing plan. For a commercial driver, this isn’t just losing a job; it’s a Clearinghouse violation that can blacklist you from the industry.
If your test is for probation, parole, or any court-ordered supervision, the scenario gets even grimmer. Getting caught with synthetic urine is a direct violation of your supervision terms. This isn’t a simple retest; it triggers a revocation hearing, and the likely outcomes are extended, stricter supervision or actual jail time. The authorities here are sticklers for the protocol, and they view any attempt to defraud the system as a fundamental breach of trust.
Now, for standard employment tests in the private sector, the consequence is usually more straightforward: immediate termination or a rescinded job offer. You can also expect to be ineligible for unemployment benefits, as termination for this reason is classified as misconduct. Many employers will also blacklist you from future consideration.
State Laws Add Another Layer of Variables
Here’s where it gets legally complex. As of now, at least 18 states have specific laws criminalizing the use or sale of synthetic urine to defraud a drug test. The penalties vary wildly—from fines to felony charges. In some states, like Texas, the user faces a Class B misdemeanor. In others, like Illinois, it’s a Class 4 felony. The critical variable is “intent to defraud.” Simply possessing it may not be illegal, but using it for a test is the trigger. I must stress: you need to know your local laws. The landscape is always shifting, and what’s a loophole today could be a closed door tomorrow.
Practical Safety Considerations
Beyond the legal risks, there are simple, practical safety steps to avoid contaminating your sample or drawing suspicion.
- Never, ever microwave a sealed container. The pressure buildup can cause it to explode, creating a huge mess and leaving you with no sample at all.
- Check for leaks before you transport it. A damp spot on your clothing or a suspicious odor in the waiting room is an immediate red flag.
- Dispose of all materials discreetly after the test. Don’t leave bottles, heating pads, or wrappers in the clinic’s trash can. That’s evidence.
- Be mindful of contamination. Carrying the bottle against bare skin, especially on a hot day, can allow sweat to alter the sample’s pH. Pour carefully to avoid getting clothing fibers or lint into the cup, and if you use a heat activator powder, ensure it’s fully dissolved and wipe the spout clean.
This is the unvarnished scenario. The reliability of a commercial kit means nothing if the legal or procedural variables in your specific case are stacked against you. For those facing tests from legal authorities, the risks are exponentially higher, and I’d strongly advise reviewing specialized guidance on passing a drug screen for probation to understand the heightened scrutiny and protocols involved. Your first step should always be a clear-eyed assessment of what you’re actually up against.
Summary: Key Steps to Maintain Proper Urine Temperature for Testing
Alright, let’s lock this down. The entire process boils down to a tight, four-step sequence you need to control from start to finish. First, you prepare your sample in the right container. Second, you apply a reliable warming method, whether that’s body heat, hand warmers, or a commercial kit with built-in heat. Third, you actively monitor the temperature strip—that green reading between 94°F and 100°F is your entire world. And fourth, you plan your transport to submit that sample within the critical four-minute window after you pour it.
Here’s the single, non-negotiable fact: the collector checks the temperature instantly when you hand over the cup. If it’s outside the 90°F to 100°F range, you fail on the spot. Everything we’ve discussed is about hitting that mark and holding it.
You now have the knowledge to manage this critical variable. The anxiety is real, but the control is in your hands. Choose the preparation and warming method that fits your specific scenario, practice the steps, and walk in with a plan. For a broader strategy that covers every angle of this situation, you can check out this comprehensive guide on how to pass a urine test for THC. You’ve got this.