If you’ve got a drug test coming up and you’re staring down the calendar knowing that the best way to detox THC isn’t an option because you don’t have weeks or months, you’ve probably heard of Quick Fix urine. In simple terms, it’s a pre-mixed, synthetic urine product designed to be a substitute for your real sample during a screening. The idea is straightforward: you’re carrying a bottle of lab-made Quick Fix synthetic urine that’s formulated to mimic the key chemical markers—like urea, creatinine, and pH—that a lab checks for.
The reason products like this even exist comes down to a frustrating biological variable: THC metabolites cling to fat cells. For a daily or heavy user, that means you can test positive for 30, 60, or even 90+ days after your last use. When a job or your freedom is on the line next week, that timeline doesn’t work. So, people turn to this urine as a potential loophole, a way to provide a clean sample without having to cleanse your own system.
This article is your beginner’s roadmap. We’ll walk through exactly what thisurine is, how it’s supposed to work, and, most critically, whether it’s the reliable solution you need for your high-stakes scenario. But as we’ll see, there are critical variables and potential pitfalls that every first-time user needs to understand before they walk into that clinic.
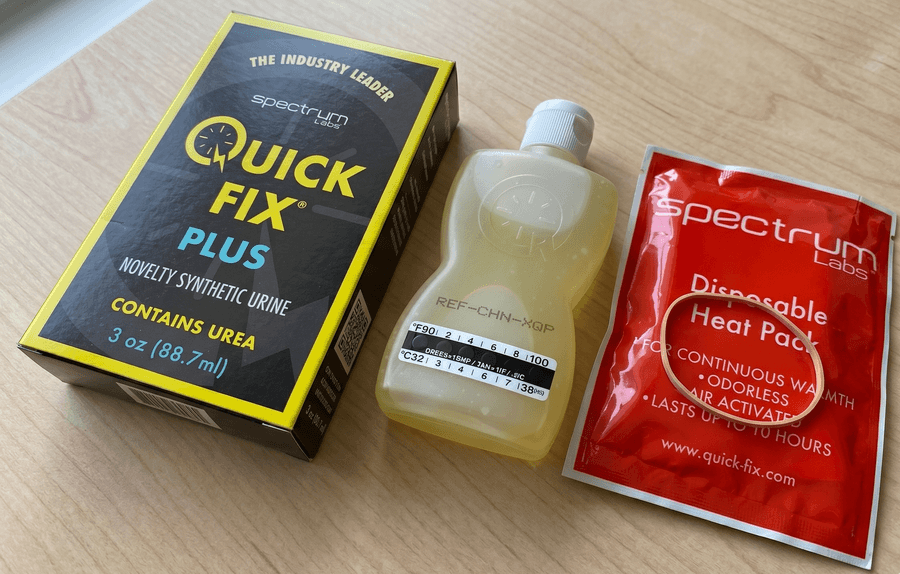
Inside a Quick Fix Kit: Components and Their Purpose
Alright, so you know the scenario: you’re considering quick fix plus urine as your potential loophole. But what do you actually get when you buy a kit? Let’s break down the standard quick fix urine kit components so there’s no confusion about what you’re handling.
A typical kit, whether it’s the quick fix plus 6.2 synthetic urine or the newer 6.4 version, contains a few core items designed to work together. The main piece is the quick fix urine bottle itself, which comes pre-mixed with the synthetic urine. The Plus version holds 3 ounces, while the standard holds 2 ounces—this is the sample you’ll be submitting. Attached to this bottle is a temperature strip. This isn’t just a sticker; it’s a critical tool that uses liquid crystal display (LCD) technology to show you the sample’s temperature. When it turns green, you’re in the optimal 94-100°F range, which is a key variable the lab checks for.
The kit also includes an air-activated heating pad. You use the provided rubber band to secure this pad to the bottle, opposite the temperature strip. Its job is to bring the sample up to and maintain body temperature for an estimated 5-8 hours. Finally, you get a set of instructions. Reading these is non-negotiable, as they explain the specific steps for your version.
Now, some kits or add-ons might include a quick fix synthetic urine belt for discreet carrying, which is part of the quick fix urine pro belt kit. You’ll also always find a quick fix urine batch validator code on the box. This is used on the official website to verify your product is authentic and not a counterfeit—a critical step given the stakes.
But here’s the estimate: knowing what each piece does is the simple part. Understanding the components is useless without knowing the exact, step-by-step protocol for preparing and using them under the pressure of a real test. That’s where most people run into trouble.
Step-by-Step Guide: How to Prepare and Use Quick Fix Urine
Alright, so you’ve got your kit and you know what the pieces are for. Now, let’s get into the actual protocol—the exact, step-by-step sequence for preparing and using Quick Fix urine. This is the part where following the instructions precisely is non-negotiable. I’m going to walk you through it in a clear, numbered order so you’re not guessing at any point.
1. Verify Your Product Before You Do Anything Else.
Before you even think about heating, check two things. First, confirm the safety seal on the bottle is intact. If it’s broken or missing, that’s a major red flag—do not use it. Second, use the batch validator code on the box on the official website. This is your only real estimate of whether you have an authentic, current product and not a counterfeit. Skipping this step is a shoddy way to start.
2. Choose Your Heating Method: Microwave or Body Heat.
You have two official paths here, and your choice depends on your scenario and access to a microwave.
- The Quick Microwave Method: This is the fastest route if you have access. Shake the bottle gently first. Then, and this is critical, remove the cap. Microwaving with the cap on can cause pressure to build and potentially crack the bottle. Microwave it for 10 seconds exactly. Take it out, give it another gentle shake to distribute the heat evenly. This shaking also helps create a natural-looking foam.
- The Slow Heating Pad Method: If you’re a truck driver or someone who might get a random test with no microwave access, this is your protocol. Activate the heating pad and attach it directly to the bottle using the provided rubber band. Place it against your body—tucked in your underwear or against your thigh. It will take an estimate of 30 to 60 minutes to bring a room-temperature sample into the target range.
3. Read the Temperature Strip Correctly.
This is the variable that causes the most anxiety, so let’s break it down. The strip on the side of the bottle uses color to give you a reading.
- Green or a Green Dot: This is your goal. It indicates the sample is within the optimal 94°F to 100°F range.
- Black or a Black Dot: The sample is overheated, above 100°F.
- No Reading / Blank Strip: This typically means the sample is either too cold (below 90°F) or, more commonly, way too hot (above 100°F), which has pushed the strip beyond its readable range.
If you overheat it in the microwave, don’t panic. Just let the bottle sit at room temperature for 2 to 5 minutes, then check the strip again until you see green. Do not try to rush the cooling by putting it in a fridge or freezer; that can mess with the chemical balance.
4. Secure the Heating Pad and Prepare for Concealment.
Once your strip shows green, it’s time to lock in the temperature. If you used the microwave method, now you attach the activated heating pad with the rubber band. This pad isn’t for getting it to temp—it’s for maintaining it for the next several hours. The manufacturer states it can keep the sample warm for up to 5-8 hours, which is your buffer for waiting rooms and travel.
5. Final Check and Body Placement.
Immediately before you leave for the test site, do one last check of the temperature strip. Ensure it’s still showing green. Then, secure the bottle on your body. The most common and effective places are in your underwear (there’s often a small pocket), tucked against your groin, or in a compression short thigh holster. The goal is to use your natural body heat as a backup to the heating pad and to keep it hidden.
A Critical Caveat on Reheating and Reuse:
Now, a common question is, “can you reheat quick fix synthetic urine?” or “can you reuse quick fix synthetic urine?” The manufacturer states that because of its biocide protection, Quick Fix can be heated and cooled multiple times without degrading. So yes, if you practice or have a test postponed, you can reheat it. However, my estimate is that for the actual test day, you want a fresh, unopened bottle with a verified batch number. Don’t introduce variables by using a bottle that’s been heated and cooled a dozen times.
Following this protocol gives you the best shot. But here’s the thing—even perfect preparation can fail if the sample cools down too much in the waiting room or if the bottle is discovered during a pat-down. That’s the next major challenge: keeping it concealed and at temperature until the exact moment you pour.
Restroom Protocol: Critical Do’s and Don’ts for Delivering Your Sample
Alright, so you’ve got the sample prepared and concealed. Now you’re in the waiting room, and your name is called. This is the moment. Everything you’ve done up to this point comes down to the next few minutes in that restroom. The protocol here is strict, and a single misstep can invalidate your sample or, worse, raise a red flag that leads to a directly observed recollection. Let’s break down the critical actions.
Restroom Protocol: Critical Do’s and Don’ts for Delivering Your Sample
Think of this as the final checklist. The collector outside is following a procedure, and you need to match your behavior to that procedure without deviation.
| Do’s | Don’ts |
|---|---|
| Do: Check the temperature strip one last time in private. Before you even think about pouring, verify the strip on the bottle reads between 90–100°F (32–38°C). This is the single most important variable. If it’s outside this range, your sample is dead on arrival. | Don’t: Flush the toilet. This is an automatic fail in most collection protocols. The water is often tinted blue, and flushing is seen as an attempt to tamper with the sample. Just don’t touch it. |
| Do: Secure the lid and check for spills. After pouring into the collection cup, ensure the lid is screwed on tightly. Wipe the exterior of the cup if there’s any spillage. A wet cup or a loose lid looks suspicious. | Don’t: Take more than 4 minutes. The clock starts when you urinate (or pour). The collector expects you back promptly to check the temperature within that window. Lingering raises suspicion and risks the sample cooling. |
| Do: Manage your nerves and body language. Take a breath. When you exit, make normal eye contact. Avoid fidgeting, adjusting your clothing excessively, or looking terrified. The goal is to appear as a normal person following a normal procedure. | Don’t: Bring personal items in. Leave your purse, bag, or briefcase outside. Unauthorized materials in the collection area are a major red flag and will likely lead to a more intrusive search or a monitored collection. |
| Do: Handle the empty container quietly. If you’re using a bottle, the sound of a cap snapping or liquid sloshing can carry in a quiet clinic bathroom. Practice opening and closing it silently beforehand. Your movement should be deliberate and quiet. | Don’t: Avoid eye contact or act rushed. While you don’t want to dawdle, bursting out of the restroom looking panicked is just as suspicious as taking too long. The technician is trained to note unusual behavior. |
| Do: Wash your hands under supervision. This is part of the official procedure. It’s a simple, expected action that shows compliance. Do it before you enter the collection area. | Don’t: Submit a sample with a bad temperature. If your strip shows it’s too hot or too cold, you have a problem. Submitting it anyway guarantees a failure. This is the primary reason samples get rejected, and it often triggers a directly observed recollection on the spot. |
The core idea here is to mimic the behavior of someone who is genuinely providing their own urine. Every action—from the time you spend to the sounds you make—is a variable the collector is subconsciously noting. A “stickler” for the rules will be looking for any loophole or deviation. Your job is to give them nothing to question. If the specimen temperature is outside that 90–100°F window, the protocol often requires the collector to assume tampering, and the next step is a much more intrusive, directly observed collection. That’s a scenario you want to avoid at all costs. Following this list keeps you within the lines of their procedure and gives your prepared sample its best chance.
Concealment and Temperature: How to Hide and Carry Quick Fix Urine
Alright, let’s talk about the moment of truth. You’ve got the bottle, you’ve followed the steps, but now you’re standing in that clinic restroom, and two massive variables are staring you down: temperature and concealment. This is where the anxiety spikes, because if either one fails, the entire procedure collapses before the lab even looks at your sample.
The Temperature Tightrope
First, let’s estimate the scenario with temperature. Official protocol is a stickler for this: the specimen has to be between 90°F and 100°F within four minutes of you handing it over. If it’s outside that window, the collector’s training flags it as a potential substitution, and the consequences escalate immediately.
Quick Fix provides a heating pad and a temperature strip on the bottle. The official method is to either microwave it for a maximum of 10 seconds or activate the pad 30-45 minutes beforehand. The manufacturer claims the pad can maintain temperature for up to 5-8 hours. However, that’s a best-case estimate. Here’s the variable they don’t stress enough: waiting room delays.
If you’re stuck in a waiting room for 30, 45, or 60 minutes, that pad is working against ambient room temperature. Body heat alone is insufficient—without the pad, the sample can drop below 90°F in under 30 minutes. If you overheat it (the strip reads black or doesn’t register), you’re told to let it cool for 2-5 minutes. But in a high-stress moment, guessing that cooling time accurately is a shoddy way to operate. You’re essentially trying to hit a moving target, and the margin for error is slight.
Concealment: The Art of the Hide
Now, where do you put it? The protocol is clear: avoid pockets. Testing sites often require you to empty them, so that’s a non-starter. The recommended places are against your body—inside your underwear, in a bra, or in a sock. The idea is to leverage your own body heat as a backup and to avoid detection during a visual check.
Specialized products like leg straps, thigh holsters, or compression shorts with inner pockets exist for a reason. They’re designed to hold the bottle firmly against your thigh or calf, minimizing slippage and noise. You must practice this setup at home. The sound of a cap clicking or liquid sloshing in a quiet bathroom can be a dead giveaway. A common piece of advice is to attach the heating pad to the back of the bottle, opposite the temperature strip, to avoid the pad’s heat giving you a falsely high reading on the strip.
The Hard Limit: Supervised Tests
But here’s the scenario where all of this becomes largely academic: the directly supervised test. This is common in probation, many DOT situations, and some federal programs. In this procedure, a same-gender observer doesn’t just wait outside; they watch the urine leave your body. You have to raise your clothing, lower your underpants, and even turn around 360 degrees to show you have no devices or prosthetics.
Using a bottle of Quick Fix in this setting is, for all practical purposes, impossible. If a device is found, the collection stops, and it counts as a refusal to test—which carries consequences often equivalent to a positive result. In some states, the act itself is illegal. For anyone wondering how to pass a drug screen for probation or facing this kind of monitored collection, the entire approach of smuggling in a bottle is a dead end with severe legal or professional risks.
So, you can manage the temperature, you can perfect the concealment, and you can execute the restroom protocol flawlessly. You might even walk out of the clinic feeling like you passed the first test. But that leads to the final, critical variable: once that sample is in the lab’s hands, will they even accept it as real? That’s the question we need to estimate next.
Assessing Quick Fix: Reliability, Detection Risks, and Real-World Results
So, does Quick Fix urine work? Let’s estimate the scenario. For a basic, unsupervised pre-employment screening at a standard clinic, the answer is a cautious maybe. Many users have passed with it. But if your test is at a major lab like Quest Diagnostics or LabCorp, or if it’s for anything federally regulated—like a DOT physical or probation—the reliability drops significantly. The core issue isn’t just about fooling a dipstick test anymore; it’s about passing a much more rigorous scientific audit of the sample itself.
Modern labs don’t just test for drugs. They run what’s called Specimen Validity Testing, or SVT. This is a mandatory protocol for federally regulated tests, and many employers use it too. SVT is a set of checks designed to ensure the urine is actually human and hasn’t been tampered with. Here’s where Quick Fix can run into problems.
The Lab’s Checklist: What They’re Testing For
Think of the lab technician as a stickler for details. They have a checklist of variables that real human urine always has. Quick Fix tries to mimic these, but it’s a static formula, and labs have gotten better at spotting the copies.
- Creatinine & Specific Gravity: These are measures of urine concentration. Human urine has a natural range (creatinine typically 20-300 mg/dL, specific gravity 1.003-1.030). Synthetic urines often land at the very bottom of or below this range. If your sample shows creatinine below 2 mg/dL with a specific gravity that’s off, it’s flagged as a “substituted” specimen. Under DOT rules, that’s treated as a refusal to test—a automatic fail.
- pH Balance: Human urine pH usually falls between 4.5 and 8.0. While Quick Fix aims for this, slight batch variations or storage issues can push it outside the normal window, triggering a flag.
- The “Smell Test” & Biocides: This one’s straightforward. Some collection sites, especially doctor’s offices, might literally smell the sample. Real urine has a distinct odor. Furthermore, to preserve shelf life, synthetic urines often contain biocide preservatives like sodium azide. Labs can screen for these chemicals; their presence is a direct indicator of adulteration.
- Advanced Biomarker Analysis: This is the high-level variable. Advanced labs use techniques like LC-MS/MS to look for specific compounds found only in human urine—things like urobilin or certain metabolites. They can also test for the absence of uric acid with near-perfect accuracy. Quick Fix’s formula, while improved, may not replicate this complex chemical fingerprint perfectly. Some lab databases even have the chemical profiles of common synthetic urines on file.
The Real-World Verdict: A Mix of Reports
Looking at quick fix urine reviews for 2025, the results are split. You’ll find user reports claiming success at unsupervised tests, even at Quest or LabCorp, when the temperature was perfect. Some have even passed probation screenings. However, there’s a growing number of reports documenting failures—results coming back as “invalid,” “adulterated,” or “not consistent with human urine.” A common failure point seems to be older formula versions (like 6.3) being detected, or temperature slipping out of the 90-100°F range during a long wait.
To answer “does quick fix urine work at labcorp?”: it’s a gamble. It might pass a basic 5-panel screen if everything goes perfectly. But for a modern lab running full validity testing and using mass spectrometry, the can fake pee be detected risk is real and significant.
A Clear-Eyed List of Pros and Cons
Let’s break this down simply.
- Pros: It’s affordable (around $40-$50), easy to find at local head shops or online, and the instructions are simple. For a low-stakes, unsupervised test where the collector isn’t using advanced SVT, it has worked for some.
- Cons: The detection risk at modern labs is its biggest flaw. It causes major temperature anxiety—keeping it in that narrow 94-100°F window is stressful and prone to error with waiting room delays. It is useless for any test that is directly observed. And if you’re caught, especially in a federally regulated scenario, the consequence isn’t just failing—it’s often treated as a refusal, which can mean losing a commercial license or facing probation violations.
When people ask “will quick fix synthetic urine pass a lab test,” the honest estimate is that it’s becoming less likely as lab technology advances. Comparisons like “x stream urine vs quick fix urine” often miss the point; the issue isn’t just the brand, but the fundamental challenge of duplicating a living, variable biological sample with a fixed chemical mixture.
For a test where your job, freedom, or license is on the line, relying on a product with this level of detection risk is a high-stakes gamble. And that reliability concern doesn’t end once you buy the bottle. It extends to how you store it and how long you’ve had it—because a compromised sample before you even leave the house is a guaranteed failure.
Shelf Life and Storage: What to Know Before Buying Quick Fix
Alright, let’s talk about a variable that gets overlooked until it’s too late: the shelf life and storage of your Quick Fix. You’re buying this for a future scenario, sometimes with very short notice. The last thing you need is to grab a bottle from the back of your drawer only to find out it’s expired. So, how long does Quick Fix urine last, and what’s the proper way to store it?
My best estimate, based on the manufacturer’s data, is that an unopened, properly stored Quick Fix kit has a shelf life of two years from its manufacture date. That’s the quick fix synthetic urine shelf life you’re working with. After two years, the product expires. Using an expired batch is a shoddy way to fail a test; the chemical balance—things like pH, creatinine levels, and specific gravity—can degrade, making it detectable as an invalid sample. So, the first protocol is to always check the expiration date.
Now, here’s the critical part: that two-year estimate is entirely dependent on proper storage. The required conditions are specific. You must store an unopened kit at room temperature, ideally between 65–75°F (18–24°C). Keep it in a cool, dry place away from direct sunlight. Sunlight and heat are the enemies here; prolonged exposure can deteriorate the formula. Avoid extreme conditions—don’t leave it in a hot car, and while one source suggests accidental freezing might be okay, the official guidance leans toward avoiding freezing to prevent any potential crystal formation or chemical imbalance. My advice? Don’t risk it. Room temperature is the safe bet.
What about reheating? A common question is, “Can I use this more than once if I don’t pass my at-home test?” The answer is generally yes. Quick Fix can be reheated multiple times without compromising the core chemical validity. The biocide protection in the formula prevents microbial growth. However, there’s a caveat. Repeated heat-cool cycles over many days might lead to minor changes in aroma or consistency after a while. Microwave reheating should be limited to short bursts—about 10 seconds at a time—to avoid overheating and melting the plastic bottle. The temperature strip should still function, but excessive handling could rub it off or damage it.
So, can you buy this in advance for an emergency stash? Yes, but with strict conditions. You must verify the batch number using the official Spectrum Labs Batch Validator tool the moment you receive it to ensure authenticity and that it’s not already near its expiration. Then, store it correctly. An opened bottle can be resealed tightly and used soon after, but same-day use after opening is optimal.
Understanding these storage basics is helpful for maintaining what you have. But it also highlights a bigger point: all this careful handling is for a product that already carries detection risks. If you’re stocking up for a high-stakes scenario, you’re not just managing a shelf life; you’re managing a significant variable in your success equation. It’s worth considering if there’s a product designed with fewer of these storage sensitivities and a more reliable track record from the start—which leads us directly into how Quick Fix stacks up against other options on the market.
Quick Fix vs. Other Synthetic Urines: An Honest Comparison
Alright, so Quick Fix is a name you hear a lot—it’s popular, it’s on the shelves, and for a lot of folks, it’s the first thing they grab. But let’s be real for a second: popularity in this space doesn’t always equal reliability. It often just means it’s cheap and easy to find. So, let’s put it up against some other options and give you an honest comparison.
First, the strengths. Quick Fix’s biggest selling points are its affordability, typically running about half the price of more advanced kits, and its simplicity. It’s a pre-mixed liquid, so there’s no powder to measure or water to add, which removes one major variable from the equation. For a basic, unsupervised test where the stakes aren’t sky-high, this can be a point in its favor.
Now, let’s talk about where it falls short compared to the field. We have to look at the variables that labs are actively checking for.
- Temperature Control: This is a massive one. Quick Fix relies entirely on a heat pad. If that pad fails, or if you’re stuck in a waiting room for an hour, your sample’s temperature can drift outside the critical 94-100°F window. That’s an immediate flag. Competitors like Sub Solution and Quick Luck use a chemical heat activator powder you add at the last second, giving you direct, on-demand control. That’s a different level of security.
- Concealment & Delivery: Quick Fix is a bottle. You have to figure out how to hide it and how to pour it without making noise. Other products, like the Incognito Belt or Monkey Whizz, are designed as wearable systems. They strap to your body, keep the sample at skin temperature naturally, and use a tube for quiet, discreet dispensing. For anyone worried about pat-downs or noise, this is a game-changing feature that Quick Fix simply doesn’t offer.
- Chemical Realism: This is where the lab detection risk really comes in. Quick Fix’s formula is basic. It has the core markers—urea, creatinine, correct pH and specific gravity—but it’s a simple, static recipe. More advanced synthetics, like Sub Solution, contain over a dozen compounds, including things like albumin to create realistic foam. Powdered kits like TestClear are made from dehydrated real human urine, so their chemical signature is inherently more authentic. My best estimate is that labs have gotten very good at spotting the consistent, synthetic pattern of a basic premixed formula like Quick Fix. Hundreds of user reports online flag it as “invalid” or “adulterated” at major labs like Quest and LabCorp, specifically because it lacks those natural biological traces.
You also have other premixed brands like UPass or Magnum, but they often share similar limitations—variable temperature control and outdated chemistry that’s on lab radars.
So, the comparison boils down to this: Quick Fix is the entry-level, budget option. It might work for a low-risk situation. But for a high-stakes test—pre-employment, probation, anything where failure has severe consequences—its weaknesses in temperature control, concealment, and chemical complexity are significant liabilities. You’re not just buying a liquid; you’re buying a system for a critical moment, and simpler isn’t always safer.
When you stack it up, you start to see that what you really need is a product that was built to address these exact shortcomings. And it turns out, there is one option in particular that directly tackles the temperature problem, the concealment anxiety, and the detection risk all in one integrated design. We’ll get into the specifics of that solution next.
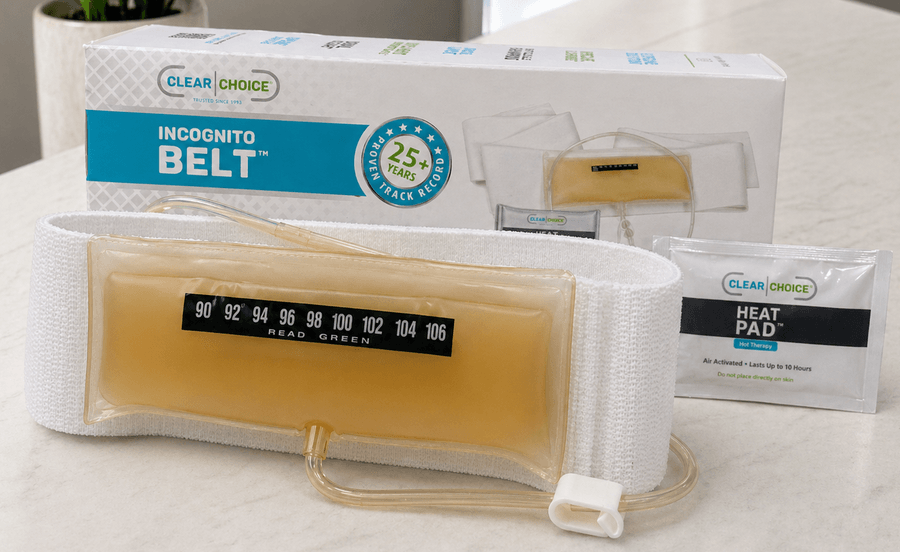
The Incognito Belt: A More Reliable Option for High-Stakes Tests
So, if Quick Fix presents these real, measurable risks for a high-stakes scenario, what does a more reliable system actually look like? This is where we need to shift our thinking from a simple bottle of liquid to an integrated delivery system. The product that consistently comes up in this conversation is the Clear Choice Incognito Belt, and it’s designed from the ground up to address the three core weaknesses we’ve just identified: temperature control, concealment, and chemical detection.
Let’s break down how it tackles each one.
The Temperature Problem, Solved by Design
The single biggest variable with a bottle is keeping it in that narrow 94-100°F window. The Incognito Belt’s primary innovation is eliminating the need for external heating pads or microwaves as your main strategy. The system is a wearable belt with a bladder bag that holds 3.5 ounces of premixed synthetic urine. You wear this bag against your skin. Your own body heat does the work, maintaining the sample at a natural, consistent temperature. This directly addresses the fear of a heating pad failing in a cold waiting room or the sample cooling down unexpectedly. The temperature strip is on the bag, pressed against your body, giving you a more accurate, real-time reading before you even enter the restroom.
Concealment and Discreet Delivery
Hiding a rigid bottle is a major source of anxiety, especially with pat-downs. The belt’s flat profile is designed to lie flush against your torso under clothing, making it far less detectable by sight or touch than a bottle in a pocket or strapped to a leg. But the real advantage is in the delivery. Instead of unscrewing a cap—which can make a suspicious click in a quiet bathroom—the belt uses a rubber tube with a simple clip. You route the tube discreetly (often through your zipper), and when you’re ready, you unclip it. The urine flows out via gravity, simulating a natural stream with minimal noise. This directly counters the paranoia about making suspicious sounds.
Addressing the Chemical Detection Fear
The anxiety that modern labs can easily spot a “shoddy” formula is valid. The Incognito Belt’s synthetic urine is formulated with 11 chemical compounds, including the key markers labs check for: urea, uric acid, and creatinine. It’s balanced for specific gravity and pH. Now, a critical disclaimer here—no product can guarantee it will pass every single advanced validity check a lab might run. However, the argument for the belt is that its formula is more comprehensive and modern than simpler, older brands, aiming to pass the standard initial screening and validity checks that most SAMHSA-regulated tests use. It’s about stacking the variables more in your favor.
Honest Caveats for a High-Stakes Tool
This isn’t a magic wand. You need to be realistic. The belt requires practice to put on and route correctly. The heat pads it includes still need a good 30 minutes to warm up, so it’s not an instant solution for a test called with zero notice. And most importantly, it is not designed for a directly observed test where someone is watching your body. For supervised collections, the risk is inherently much higher with any substitution method. The belt offers more discretion than a bottle, but it’s not invisibility under direct observation.
The core takeaway is this: for the specific, high-anxiety scenarios of an unsupervised pre-employment or probation test, the Incognito Belt represents a more engineered approach. It systematically reduces the most common points of failure associated with a basic bottle kit. The upfront cost is higher—typically $125-$135—but you’re investing in a system designed for reliability when the stakes are highest.
Of course, knowing that a belt-style kit is a stronger option is only half the battle. You still need to know exactly what features and assurances to look for to avoid wasting money on a dudd or a counterfeit. That’s the next critical piece of the puzzle.
First-Time Buyer’s Checklist: Key Features in a Synthetic Urine Kit
Alright, so you’re looking at all these options and every brand is screaming that it’s the best, the most reliable, the undetectable one. It’s overwhelming, especially when you’re already stressed about the test itself. Let’s cut through that noise. If you’re going to spend your money, you need a simple filter—a checklist of non-negotiable features. Think of this as your pre-flight inspection. If a kit is missing any of these, your risk of failure goes up significantly.
Here’s what you need to verify, item by item:
1. A Reliable Temperature Control Method.
This is the single biggest point of failure. The lab will check the temperature of your sample within four minutes of you handing it over. It has to be between 90°F and 100°F. If it’s outside that window, they’ll likely reject it on the spot, suspecting it was stored or substituted. A quality kit must include a proven method to get and keep the sample in that range—typically a chemical heating pad. If a kit doesn’t include a way to heat it, that’s a major red flag.
2. Inclusion of Uric Acid and Creatinine.
Modern labs don’t just test for drugs; they run specimen validity tests (SVT) to see if the sample is actually human urine. Two key markers they check are uric acid and creatinine. If your synthetic urine doesn’t contain these, or has them at the wrong levels, the lab can flag it as “invalid” or “adulterated.” A reliable label will list these ingredients. If they’re missing, the product is likely outdated and easily detected.
3. A Concealment-Friendly Design.
You have to get this into the restroom and use it without being obvious. A basic bottle can be bulky and hard to hide. Look for kits designed with this in mind—whether it’s a slim profile, a secure cap system that doesn’t make a loud “click,” or a delivery method like a belt that keeps your hands free. The easier it is to conceal and use discreetly, the lower your stress and chance of making a mistake.
4. A Clear, Readable Temperature Strip.
The strip on the bottle is your only real-time confirmation that you’re in the safe zone. It needs to be easy to read, with distinct color changes. If the strip is blurry, rubs off against your skin, or is just hard to interpret in a dimly lit bathroom, you’re flying blind. You need that visual confirmation right before you pour.
5. A Tamper-Evident Seal.
When you open the box, the bottle itself should have a safety seal—like a shrink band or a foil seal. This is your proof that the product hasn’t been opened, diluted, or swapped out before it got to you. A missing or broken seal is a huge warning sign that you might be holding a counterfeit or an expired product.
Common Red Flags to Avoid:
- No Safety Seal: As mentioned, this is a deal-breaker.
- Brands with Recent Lab Detection Reports: Do a quick search. If forums or reviews are buzzing about a specific brand getting flagged at Quest or LabCorp, steer clear.
- Kits Without a Heating Method: If it’s just a bottle of liquid with no pad or activator, it’s useless.
- Unclear or Contradictory Instructions: If the preparation steps are confusing or don’t make sense, you’re being set up to fail.
Using this checklist won’t guarantee you pass, but it will immediately help you filter out the most unreliable options. It narrows the field to products that at least have the basic engineering to have a chance. But even the best product in the world is worthless if you end up with a fake or an expired batch. That’s why knowing what to buy is only half the equation; knowing where to buy it safely is the final, critical step.
Buying Authentic: How to Avoid Scams and Find Legitimate Retailers
Alright, so you’ve got a good idea of what to look for in a kit. But even the most well-engineered product is worthless if you end up with a fake or an expired batch. That’s why knowing what to buy is only half the equation; knowing where to buy it safely is the final, critical step. Let’s go over the protocol for sourcing your kit.
The Primary Warning: The Counterfeit Market is Real
If you search for “quick fix urine nearby” or “quick fix urine in store,” you might find local head shops or big online marketplaces. Here’s the variable you need to estimate: the risk of a tampered, expired, or counterfeit product on these platforms is high. Third-party sellers on sites like Amazon, Walmart, or eBay are a common source for fakes. A local head shop might offer less anonymity and could be stocking old inventory. The core idea is this: if the source isn’t verified, the product’s authenticity—and therefore its chance of working—is a complete unknown.
Your Best-Case Scenario: Official and Verified Retailers
The most reliable protocol is to buy directly from the manufacturer’s website or from verified, reputable online retailers that specialize in these products. For Quick Fix, this means looking for official Spectrum Labs retailers. When you search for “where to buy quick fix synthetic urine,” prioritize sites that are clearly authorized. The benefit here isn’t just the product; it’s access to customer support and the most current formula, which is a significant advantage if any variables pop up.
The Delivery Checklist: Inspect Everything
When your package arrives, do not break the seal immediately. Perform a physical inspection first.
- Safety Seal: The bottle must have an intact, factory seal. If it arrives without one, do not use it. Contact the seller immediately for a replacement. This is a non-negotiable protocol.
- Expiration Date: Check that the date is clearly printed and far in the future.
- Temperature Strip & Hand Warmer: The strip should be undamaged. Authentic Quick Fix kits include a Spectrum-branded hand warmer; an off-brand warmer is a red flag.
- Batch Validation: This is your final authenticity check. Locate the batch number on the instruction insert or bottle label and enter it into the official validator on the Spectrum Labs website. If the code is invalid or missing, that indicates a counterfeit. You can then contact Spectrum Labs customer service for a free replacement.
Addressing the Price Objection
I understand the hesitation around the cost of premium kits. When you see the quick fix urine price, it can give you pause. However, consider the alternative scenario: spending money on a product that fails because it was a cheap fake from an unauthorized retailer. Buying from official sources is an investment in reliability. While I can’t provide specific quick fix urine coupon codes, official retailers sometimes run promotions. The core estimate is this: the cost of a legitimate kit is a fraction of the financial and legal consequences of a failed test. Weigh that variable carefully before deciding where to spend your money.
Making Your Choice: A Low-Risk Path Forward for Your Drug Test
Look, I get it. The stress is real. When your job, your freedom, or your future is hanging on that cup of urine, every variable feels like a potential landmine. Your concern isn’t just valid; it’s the entire point of this breakdown. You deserve a clear, honest path forward, not more confusion.
So, let’s do a quick recap of the scenario we’ve walked through. We’ve established that Quick Fix is a pre-mixed, budget-friendly synthetic urine. We’ve outlined the protocol for using it, and we’ve been clear about its primary limitation: temperature control. We’ve also estimated where it might work and where the variables—like a supervised test or advanced lab analysis—can cause it to fail.
Here’s my core recommendation, and it’s based on a simple risk assessment. If this is a low-stakes, unsupervised pre-employment screen where you’re alone in the restroom, Quick Fix may be an adequate, low-cost option. However, if this is a high-stakes scenario—think probation, a dream job, a DOT physical, or any situation where your future is on the line—the detection risks and temperature variables with a basic bottle setup are simply too great.
For those high-stakes tests, a more reliable and discreet solution is the Incognito Belt. It’s designed to address the core shortcomings we identified: its integrated belt system uses body heat for more stable temperature maintenance and offers a far better concealment and delivery method than a loose bottle.
My final estimate is this: the right choice isn’t about the product, it’s about the consequence. Take the time to choose the one that matches your specific risk level. Check the seal, practice the steps with water, and go into your test with a plan, not just anxiety. That’s the low-risk path forward.