Look, if you’re reading this, you’re probably staring down a drug test date and feeling that knot in your stomach. The stakes are high—maybe it’s a job you need, or a probation officer you can’t afford to anger. That anxiety is real, and it’s valid. This guide is built to cut through that panic by focusing on a specific tool: Clear Choice Sub Solution.
Let’s be clear on what we’re dealing with. Clear Choice Sub Solution is a powdered synthetic urine kit, on the market since 2003. It’s designed as a substitute for real human urine in unsupervised drug tests. The core idea is to give you a sample that passes the lab’s validity checks for things like pH, specific gravity, and creatinine. You’ll find a lot of talk about it online; user reviews often highlight its realistic appearance and the control offered by its heat activator powder, with many reporting success in pre-employment scenarios when the temperature is managed correctly.
Now, about getting it: you won’t typically find Sub Solution at a local corner store. It’s primarily sold through the official Clear Choice website and a handful of authorized online retailers. Purchasing from these direct channels is critical to avoid the counterfeits that plague this market.
But having the kit is only half the battle. The anxiety doesn’t vanish when you open the box. That’s why this isn’t just a review—it’s a troubleshooting manual. We’re going to walk through the common, costly errors that lead to failure. We’ll cover the absolute necessity of nailing the 94-100°F temperature window, the high-stakes game of hiding it on your body, and why assuming all labs test the same way is a mistake. My goal here is to give you a clear-eyed protocol, so you can walk into that clinic with a plan, not just a prayer.
Know Your Kit: Critical Components of Clear Choice Sub Solution for Success
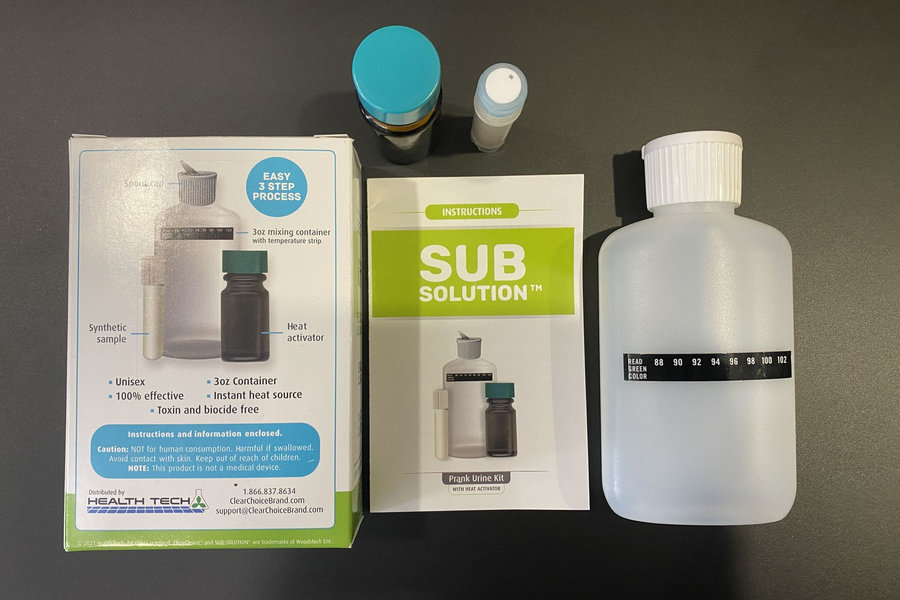
The first mistake happens before you even start practicing. It’s not about the temperature or the hiding spot—it’s about not fully understanding the kit you’re holding. Folks, if you don’t know what each piece is for, you’re building your protocol on a shaky foundation. Let’s break down the sub solution synthetic urine kit components so you can see why each one is non-negotiable.
This isn’t a pre-mixed liquid you just shake and pour. The core of the sub solution powdered urine kit details is a vial of powdered synthetic urine concentrate. You mix this with water yourself. This is a critical design choice. A powdered formula doesn’t need long-term biocides to stay preserved in a bottle for months, which means you’re creating a chemically fresher sample that’s less likely to be flagged for containing those preservatives. It also gives this kit a much longer shelf life—estimate two to three years if stored properly—compared to its liquid counterparts.
Then you have the patented heat activator powder. This is your on-site, precision tool for battling the number one failure cause: temperature. It triggers a rapid exothermic reaction to bring your sample into the 94°F–100°F window within seconds. The protocol is to add it in small, incremental amounts—starting with about a third or a quarter of the vial—based on how cold your water was. This directly combats the anxiety of waiting room delays; you can adjust the temperature right before you walk in. But be a stickler here: overdosing can push the sample above 100°F, which is just as invalid as one that’s too cold.
Affixed to your mixing container is the temperature strip. This is your verification tool. It’s designed to show a green reading only within that critical 94°F to 100°F range. If you see no reading at all, your sample is either below 88°F or above 102°F. A common user error is touching the strip with a warm finger, which can give a false high reading and lead to a catastrophic mistake.
The mixing container itself is where you combine the powder and water, and then add the heat activator. Proper shaking for 10-20 seconds after adding the activator is essential to dissolve the granules fully and ensure an even temperature distribution.
Understanding the synthetic formula for success is the final piece. Sub Solution is formulated with 11 to 14 chemical compounds—including urea, uric acid, and creatinine—to replicate the key markers labs check during specimen validity testing (SVT). It’s biocide-free and designed to pass standard validity checks for pH, specific gravity, and creatinine. Knowing this helps you understand its strengths and its limits.
One last critical point on sourcing: a major avoidable error is thinking you can just grab this on Amazon. The reality is that why buying sub solution on amazon is a mistake comes down to limited stock, regulatory hurdles, and a high risk of counterfeit or expired products. You need to go directly to a trusted vendor to ensure you’re getting the genuine, effective kit.
Now that you know what each piece does and why it’s there, the logical next question is: how do you put it all together correctly?
Step-by-Step Guide: Proper Use of Clear Choice Sub Solution to Avoid Errors
Alright, let’s get into the actual procedure. I know the anxiety is high, and the temptation is to just rip everything open and hope for the best. That’s the single biggest mistake I see folks make—guessing the steps. This is a protocol, and skipping or scrambling the order is how you end up with an invalid or suspicious sample. So, let’s walk through this step-by-step. Follow this exactly, and you eliminate the most common user errors.
1. Initial Verification (The “Don’t Assume” Step)
Before you do anything else, inspect the kit. This is your first line of defense against a bad batch.
- Check the box and bottle for a visible expiration date. If it’s passed, don’t use it.
- Confirm the safety seal on the powdered urine vial is intact. If it’s broken when you open the box, that’s a major red flag—consider the kit compromised.
- Common Confusion Point: Do not break the seal on the powdered urine vial or open the heat activator powder until you are ready to use them. They are stable until mixed or exposed.
2. Mixing the Solution (The “No Shortcuts” Step)
This is where precision matters. You are creating a substitute that needs to match human urine’s chemical properties.
- Take the plastic mixing container and unscrew its cap before you add anything.
- Fill it with water. Critical: Do not use tap or plain bottled water. Use filtered or distilled water to avoid contaminants that can alter the pH or specific gravity. Fill it to just below the brim.
- Now, open the powdered urine vial and pour its entire contents into the water.
- Screw the cap on tightly and shake gently. You need to shake until every bit of powder is fully dissolved. If you see particles floating around, keep shaking. An incomplete mix can create inconsistencies a lab might notice.
3. Heating with the Activator (The “Controlled Reaction” Step)
This is the most time-sensitive part. The heat activator gives you a quick burst of heat, not long-term warmth.
- Check the temperature strip on the side of the container. If there’s no reading, your solution is below 88°F.
- Open the heat activator vial. If the powder is clumped, tap the vial to break it up into a loose granular form.
- How much to add depends on your starting temperature: If the strip shows nothing (below 88°F), you’ll need about one-third of the powder. If it reads between 88-92°F, start with about one-quarter. Pour the powder into the vial’s cap first to measure, then add it to the solution. This gives you control and prevents accidentally dumping it all in and overheating.
- Secure the cap again and shake for 10-20 seconds. Then, wait another 5-20 seconds for the chemical reaction to stabilize before you check the strip again.
4. Final Temperature Check & Adjustment (The “Green Zone” Step)
Your target is the green zone on the strip, typically 94°F to 100°F.
- If you’re in the green, you’re ready. If you overshoot and go above 102°F, you need to cool it down. Place the container on the coldest surface you can find with the temperature strip facing up. A cold countertop or even the floor can work. Do not put it against your skin, as your body heat will give a false high reading.
- Remember, the activator’s heat fades. You must use this as close to your submission time as possible. If you have a long wait in the clinic, you’ll need a plan to maintain that temperature, which we’ll get into later.
5. Final Preparation for Pouring (The “Last Second” Step)
Once that strip is solidly green, you’re on the home stretch.
- Flip up the spout cap on the mixing container. This is what you’ll pour from.
- Right before you pour, give the container one more gentle shake. This creates a slight foam or bubbles, which mimics the appearance of real urine in the cup. It’s a small detail, but it helps with the visual inspection.
So, the sequence is: Verify, Mix, Heat, Check, Pour. Don’t break the seals early, use the right water, control the heat activator dose, and nail that temperature at the last possible moment. Following this protocol addresses the core confusion around preparation and puts you in the strongest possible position.
GET YOUR SUB SOLUTION URINEFinal Preparations: A Checklist for Clear Choice Sub Solution Success
All right, so you’ve gone through the mixing and heating protocol. The solution is in the container, and the powder is dissolved. But before you walk out that door, there’s a final, critical step. This is your pre-flight checklist. Think of it like a pilot checking their instruments before takeoff. Missing one thing here can ground the entire mission. Let scan through the items.
Your Final Pre-Flight Checklist:
- Verify the Temperature Strip is Readable and Shows a Blank Slate. Look at the strip on the mixing container. Is it clean and easy to read? Now, because you haven’t added the heat activator yet, it should show no reading at all. That’s correct. A blank strip means the solution is below 88°F, which is your starting point. If it’s already showing a color or number, something is wrong—your water may have been too warm, or the strip is faulty. You need a blank slate to properly gauge the heat activator’s effect later.
- Confirm the Safety Seal Was Removed Before You Left. This is a big one. The clear plastic safety seal around the bottle cap must be fully removed at home, not in the testing facility bathroom. Toss it in your trash. If you try to peel that crinkly seal off in a silent restroom, it’s a loud, suspicious sound. Removing it beforehand is a simple step that eliminates a major noise variable.
- Ensure the Heat Pad is Securely Attached to the Correct Side. The heat pad should be firmly affixed to the opposite side of the container from the temperature strip. You want the gentle warmth to radiate through the liquid and be measured by the strip, not for the strip to be directly against the heat source, which can give a false high reading. Press around the edges to make sure the adhesive is holding.
- Check That the Spare Cap is Tightened to Prevent Leaks. The kit comes with a spare, solid cap for transport. After you’ve finished mixing and are ready to stash the container, screw this cap on finger-tight. Give it a gentle test tilt over a sink. Any leak, no matter how slight, will compromise your sample and your clothing. This is a basic but vital containment check.
- Inspect the Heat Activator Powder. Open the heat activator vial and look at the powder. It must be loose and granular, like fine salt. If it’s clumped into a solid mass from moisture, it’s compromised and won’t dissolve or react properly. If it’s clumped, do not use it. This is a scenario where having a backup plan or a fresh kit is your only real option.
- Do a Final Visual for Undissolved Particles. Hold the mixing container up to a light. Look through the liquid. You should see a clear, uniform solution with no floating specks, clumps, or sediment at the bottom. Undissolved particles are a validity flag. If you see any, you need to gently shake again until they are completely gone.
- Take One Last Mental Run-Through of the Sequence. In your head, rehearse: Arrive. Enter restroom. Lock door. Retrieve container. Check temperature strip (it will likely show a reading now from the heat pad). If it’s in the green (94-100°F), you pour. If it’s low, you add a measured amount of heat activator, shake, wait, and recheck. If it’s high, you cool it. The cap makes a slight click when you flip it open—be ready for that sound.
This checklist isn’t about paranoia; it’s about protocol. Each item addresses a specific, preventable point of failure. By methodically verifying these components and conditions before you leave your controlled environment, you’re not just preparing a sample. You’re managing variables. And in this scenario, controlling the variables is the entire game.
Managing Temperature: Preventing the Top Reason for Drug Test Failure
Look, if your sample gets rejected, the number one reason, the most common failure point across the board, is going to be temperature. It’s the lab’s first and easiest validity check—they don’t even get to the chemistry if this fails. The protocol is strict: your sample has to be between 90°F and 100°F (that’s 32°C to 38°C) when they check it, and they check it within four minutes of you handing it over. For Clear Choice Sub Solution, you’re aiming for a tighter, safer window of 94–100°F. If you’re outside that range, the test is invalid before it even begins. Below 90°F, they assume it’s old, stored, or substituted. Above 100°F, they assume you’ve artificially heated it. In either scenario, you fail.
So, let’s diagnose the common failure points and the fixes. The anxiety here is real—faulty equipment, long waits, your own nervousness causing mistakes.
First, the built-in temperature strip. It’s your primary tool, but it’s also a point of failure. The adhesive can weaken from body heat, causing it to rub off against your skin in transit. If that happens, you’re flying blind. The strip can also give a false high reading if it’s pressed directly against your skin for too long, as your body temperature can bleed through the bottle and skew the reading by 5 to 10 degrees. My best estimate is to treat it as your first indicator, but not your only one.
The fix: Always have a backup plan. Before you leave, verify the strip’s reading against a separate, reliable digital thermometer. If the strip is missing or you doubt its accuracy, that backup thermometer becomes your source of truth. In the bathroom, if you can, quickly feel the bottle—it should feel warm, not hot, like a bottle of milk left out for a baby.
Second, overheating. This is a major risk with two common causes. One, you microwave it for longer than the recommended 10 seconds. Two, you overdose the heat activator powder. The powder is a fantastic tool for a quick temperature bump, but it’s dose-sensitive. If you add too much, you can easily overshoot past 100°F. And here’s the critical variable: overheating doesn’t just look suspicious, it can actually degrade the synthetic chemicals in the solution, like urea, causing you to fail the later chemical validity tests.
The fix: Follow the microwave instructions to the second—literally. For the heat activator powder, start with less than you think you need. A small amount, about one-third of the vial, is often enough to raise the temperature a few degrees. You can always add a tiny bit more, but you can’t take it out. After adding, shake well, wait 30 seconds, and recheck.
Third, and this is the big one for a lot of folks, is cooling during a wait. Synthetic urine loses heat at a rate of about 1–2°F per minute in ambient air. If you activate the heat source too early, or if the testing site is cold and air-conditioned, you can drop below the 94°F minimum while sitting in the waiting room.
The fix: This is about timing. The heat activator powder gives you a burst of heat that lasts about 30 minutes. You do not want to use it until you are minutes away from going in. If you have a long, unpredictable wait, your best bet is to rely on the included heat pad, attached properly, to provide a slower, steadier warmth. The pad is your long-game tool; the powder is your last-minute adjustment tool.
So, the protocol is: verify with a backup thermometer, use the powder sparingly and late, and rely on the pad for maintenance. Get this right, and you’ve cleared the first, biggest hurdle. Of course, even a perfect-temperature sample is useless if you can’t get it into the room. That’s the next layer of the protocol—concealment.
GET YOUR SUB SOLUTION URINEConcealment Strategies: Avoiding Detection with Clear Choice Sub Solution
The first thought that hits you in the waiting room is the sound. That little click of the bottle cap feels like a gunshot in the quiet. Then, the collector calls your name and says, “We’ll need you to empty your pockets, please.” Your heart drops. This is the scenario where most concealment plans fall apart, because the protocol is designed to catch exactly what you’re trying to do.
Let’s break down the variables. Standard collection procedure, especially for DOT or any observed collection, requires you to remove outer layers like jackets and hats and to empty your pockets under supervision. The collector is a stickler for the rules; their job is to look for adulterants or devices. So, placing the bottle in a pocket is a high-risk mistake. If they find it, it’s not just a failed test—it can be interpreted as an intent to tamper, which triggers an immediate, directly observed collection. That means a witness watches you urinate, and they will make you raise your shirt and lower your pants to check for prosthetics. Finding a device in that scenario constitutes a refusal to test, which carries all the same consequences as a positive result.
So, the protocol shifts from “hiding” to “secure, body-based concealment.” The goal is to have the sample on your person in a location that isn’t subject to a standard pocket check and that maintains temperature. The most reliable spots are against the body where warmth is natural: inside the waistband of your underwear, tucked into the groin area, or for some, inside a bra. These areas are less likely to be casually inspected and use your own body heat as a backup to the heat pad.
A dedicated holster or belt system, like the Clear Choice Incognito Belt, is engineered for this specific scenario. It’s an adjustable, waist-worn pouch that holds the bottle securely against your skin, minimizing movement and the sloshing sound that can give you away. This addresses the anxiety over noise directly, as the fabric muffles the sound better than a bottle loose in clothing.
Now, the critical escalation path: if you have any reason to suspect your test will be supervised—this is common for return-to-duty, follow-up tests, probation, or if the collector has a valid reason to suspect tampering based on the protocol—then this entire method is a non-starter. A directly observed collection is a deal-breaker for synthetic urine. The observer’s instructions are thorough, and attempting to use a device during one is a serious violation. Your risk assessment must account for this. If your test is unsupervised, concealment is a manageable variable. If it’s supervised, you need to consider other options entirely. The strategy isn’t just about finding a good hiding spot; it’s about correctly identifying the testing scenario first.
Evolving Detection Methods: Why Clear Choice Sub Solution Stands Out
Here’s a scenario that might sound familiar: you’ve heard that synthetic urine can be a loophole, and maybe a friend passed a test years ago with a cheap brand. The critical variable you have to understand is that the labs have evolved. Assuming any synthetic urine will fly under the radar is a mistake that can lead directly to a failed test.
Let me explain the protocol. Modern labs don’t just test for drug metabolites. First, they run what’s called Specimen Validity Testing, or SVT. This is a mandatory set of checks on every single sample before it ever gets to the drug panel. Understanding how synthetic urine is detected starts with these protocols. The lab is acting like a stickler for authenticity. They’re measuring things like pH, creatinine levels, and specific gravity to see if the sample behaves like real human urine. If the SVT flags your sample as abnormal, it’s reported as invalid or substituted, regardless of whether it shows drugs or not. That’s an automatic fail.
This is where older or cheaper brands, like UPass, often run into trouble now. The labs have gotten smarter. They test for biocides—preservatives like sodium azide that companies add to synthetic urine to give it a shelf life. If a lab detects a biocide, that’s a clear sign of adulteration. Furthermore, many cheap formulas are poorly buffered. Their pH can drift outside the normal human range of about 4.5 to 9.0, which is another red flag. They might also have creatinine levels that are too low or a specific gravity that doesn’t correlate, making the sample look “substituted.”
Clear Choice Sub Solution is designed with these modern validity checks in mind. Its formula is biocide-free, so it avoids that common detection method. It’s also formulated with the correct levels of urea, uric acid, and creatinine, and it’s buffered to maintain a physiological pH. The manufacturer updates the formula annually to try and stay ahead of evolving lab detection methods. Now, I need to be clear: this is my best estimate of its positioning, and no formula is guaranteed to pass advanced confirmatory testing like GC-MS analysis, which can look at a molecular level. But for the standard SVT and immunoassay screens, its composition is a significant advantage over outdated options.
A quick word on another variable: heat activator powders. Some brands rely on these, but adding a powder to your sample introduces its own risk of detection. Clear Choice uses a heat pad instead, which is a more discreet and standard method for temperature regulation.
All this leads to a logical question: if the formula is good, does it ever go bad? That’s about shelf life and storage, which is a crucial piece of the puzzle.
Shelf Life and Storage: Ensuring Your Synthetic Urine Remains Effective
So, if the formula is good, does it ever go bad? That’s a critical variable. A perfectly formulated kit can absolutely fail if it’s old or has been stored incorrectly. Let’s break down the shelf life and storage protocol.
First, the expiration date. An unopened bottle of Clear Choice Sub Solution has a guaranteed minimum shelf life of six months from the date you buy it. You will find an expiration date printed directly on the packaging. I cannot stress this enough: always verify that date before you plan to use it. An expired product is a compromised product; its pH and creatinine levels can drift, increasing the risk of an invalid result.
Now, what about after you’ve mixed it? Here’s where the timeline gets specific. Once mixed, the solution is stable at room temperature for up to eight hours. If your test is within that window, you’re in the clear. If your plans change, you have two approved options for storage: you can refrigerate it in an airtight container for up to 48 hours, or you can freeze it for long-term storage, where it remains viable for up to six months.
This brings us to a couple of important caveats. Reheating the solution multiple times is not recommended. Each heat-cool cycle can introduce instability, potentially degrading the chemical balance. If you freeze it, avoid frost-free freezers. The automatic defrost cycles cause temperature fluctuations that can compromise the product’s consistency. Once thawed, use it; don’t refreeze.
Finally, a practical step for your peace of mind: when your kit arrives, immediately check for the safety seal on the bottle. A missing or broken seal is a red flag for tampering or that the product may be old. Verifying this seal is a simple but crucial part of ensuring you’re starting with a viable, uncompromised product. Proper storage isn’t just a suggestion; it’s a core part of the procedure for maintaining effectiveness.
GET YOUR SUB SOLUTION URINEWeighing the Options: Pros and Cons of Synthetic Urine for Drug Tests
So, you’ve got the kit, you’ve stored it properly, and you’ve checked the seal. All the preparation steps are pointing toward a go. But before we move into the final strategies, we need to pause and have a serious, big-picture conversation. Because no solution is without its trade-offs, and this one has some major variables you need to weigh.
The core of the decision comes down to this: the type of test you’re facing. Let’s break down the scenario.
The Potential Upside: A Reliable Tool for the Right Situation
For a specific, common scenario—the unsupervised, pre-employment screening at a clinic like Quest or LabCorp—a lab-tested synthetic urine like Clear Choice Sub Solution can be a highly reliable tool. Here’s the estimate on why:
- It’s Designed to Pass Modern Checks: The formula is built to match the key validity markers labs test for: pH, specific gravity, creatinine, and it’s biocide-free. This isn’t just colored water; it’s engineered to pass the multi-parameter validity testing (SVT) that flags inferior products.
- Speed and Control: Unlike dilution methods that take days and can leave you with a suspicious “dilute” result, this gives you control over a short timeframe. You prepare it fresh, manage the temperature, and submit. For a test with a known date, that control is a major advantage.
- User-Reported Success: When the temperature is right and the procedure is followed, there are many reports of successful outcomes in unsupervised settings. The protocol, if executed correctly, addresses the main failure points.
The Significant Downsides: Risks You Cannot Ignore
Now, here’s the critical part of the analysis. The consequences of getting caught are not a simple “fail.” They are severe and context-dependent.
- The Legal Loophole is Closing: Using synthetic urine to defraud a drug test is explicitly illegal in at least 18 states. The penalties are not minor. We’re talking potential misdemeanors with fines up to $2,500 and jail time, and in some states like Florida, repeat offenses can be charged as a felony. Even in states without a specific ban, broader fraud or obstruction laws could apply. This is a legal variable you must estimate for your location.
- It is Useless for Supervised Tests: If the collection is directly observed—which is common for probation, parole, military, or Department of Transportation (DOT) randoms—the product is virtually guaranteed to be detected. The risk of detection in this scenario is near-total.
- Career and Industry Consequences are Extreme: This is the highest-stakes variable. For a DOT-regulated safety-sensitive position (like a truck driver), a substituted test is reported as a refusal. This means immediate removal from duty, a mandatory return-to-duty process, and potential permanent disqualification from the industry. For private sector jobs, it typically means immediate termination and a rescinded job offer. For court-ordered tests, it’s a direct violation that can lead to revocation of probation and incarceration.
The Honest Broker Assessment
So, is it the right tool? My best estimate is this: Clear Choice Sub Solution is a potentially viable solution only for unsupervised, non-DOT, non-court-ordered urine tests. It is a high-risk, prohibited strategy for any supervised, regulated, or legally mandated scenario.
You have to be a stickler about your specific situation. The anxiety of hiding the bottle is one thing; the reality of a felony charge or a career-ending refusal is another variable entirely. Weigh the potential reliability against the catastrophic cost of failure in your specific context. This isn’t about what’s fair; it’s about what the current protocols and laws allow.
Synthetic Urine Comparisons: Clear Choice Sub Solution vs. Other Options
You’re looking at the options, and a reasonable question pops up: “Why not just grab the cheaper brand at the local head shop, or use real urine from a friend?” It’s a fair thought. Let’s break down the variables, because this choice is a core part of the risk calculation.
First, let’s talk about the cheaper, older brands like Quick Fix. The core issue is their formula. My best estimate, based on user reports and lab trend analysis, is that products with a basic urea-uric acid-creatinine profile now have roughly a 50% or less chance of passing a modern validity check. Labs have cracked down; they’re testing for specific gravity, pH, and the presence of biocides—preservatives that real urine doesn’t have. Some users report that Quick Fix can even appear slightly green under light, a visual tell for a seasoned tech. When you’re facing a test that could determine your job or freedom, a coin-flip chance is a shoddy way to make a decision. Following a Quick Fix preparation guide shows how basic the requirements are compared to more advanced kits.
Then there’s the “real urine from a friend” scenario. On the surface, it seems foolproof—it’s real! But it introduces a whole new set of biological and logistical hazards. You’re banking on your friend being truly clean, with no metabolites hiding in their system. You’re also betting on getting the temperature perfect (94-100°F) and using it within a very short window before it degrades, smells off, or bacteria grow. There’s also the non-zero risk of transmitting an STI. It’s not the simple, clean loophole it appears to be.
This is where a premium kit like Clear Choice Sub Solution or its pre-mixed successor, Quick Luck, changes the scenario. The difference isn’t just marketing; it’s in the chemistry. Sub Solution contains 14 chemical compounds found in human urine, including albumin, which creates a natural froth. Its formula is biocide-free and updated annually to match new lab screening parameters. The heat activator powder gives you granular, on-demand control, unlike a heat pad that can overshoot to 165°F and damage the sample. Quick Luck offers the same advanced formula but in a ready-to-use liquid, eliminating the mixing step for a higher price.
So, the decision tree looks like this: a $30 kit with an estimated 50% pass rate, or a $95 kit with an estimated 90% pass rate. The choice is a risk calculation. The higher cost of the premium product is your insurance policy against the far higher cost—financial, professional, and personal—of a failed test. Choosing a proven, complex formula is the key to stacking the variables in your favor, but that only matters if you get the authentic product, which is the next critical variable to lock down.
Safe Purchasing: How to Avoid Counterfeit Synthetic Urine Kits
So, you’ve decided on a premium kit. The next critical variable to lock down is making sure you actually get the authentic product. This is where a lot of folks make a costly mistake. The biggest error is buying from random online marketplaces or just walking into a local smoke shop. These channels are rife with counterfeits, and using a fake is a guaranteed way to fail.
The risks here are severe. You could get an expired product where the chemical balance has degraded. The safety seal might be broken, meaning someone tampered with it. In the worst-case scenario, it’s a completely fake formula that will instantly flag as invalid at the lab. My best estimate is that a significant portion of failures blamed on the product itself are actually due to using a compromised, inauthentic kit.
The solution is simple but non-negotiable: you must purchase from the official manufacturer’s website or a list of authorized, verified retailers. For Clear Choice Sub Solution, this means going directly to their official site. This is the only way to guarantee you’re getting fresh stock with a valid shelf life, an intact product, and access to real customer support if you have an issue.
If you’re considering a local head shop, use extreme caution. You can search “synthetic urine near me” or check Weedmaps, but inspect the packaging meticulously before you buy. Look for official holograms, correct branding, and a printed expiration date. For other brands like Quick Fix, a key tell is the batch number—you should be able to verify it on the manufacturer’s website. If the batch code is missing, invalid, or the hand warmers aren’t the correct brand, you likely have a fake.
Ultimately, spending a little more time and money to source the real thing is your insurance policy. A counterfeit kit doesn’t just waste your money; it wastes your one shot at passing.
GET YOUR SUB SOLUTION URINECrisis Management: Handling Unexpected Issues with Synthetic Urine
All right, so you’ve sourced a legitimate kit, you’ve prepped it meticulously, and you’re walking into the clinic. In a perfect scenario, that’s the end of the story. But we don’t always operate in a perfect scenario. Variables pop up. A heat pad might be a dud. The collector might seem a little too interested. You might get a result back that isn’t a simple pass or fail. This is about damage control—knowing your options when the plan hits a snag so you can maintain some agency in a moment of panic.
Let’s walk through a few common crisis points.
Scenario 1: Your Heat Pad is a Dud.
This is a frequent point of failure. If you attach the pad and the temperature strip isn’t climbing, or you realize it’s cold before you go in, you have a few last-resort options. Your own body is a reliable, if slow, heat source. Tucking the bottle securely against your skin—in the groin area or under the armpit—for an extended period can gradually bring it into the 94-100°F range. The estimate is that this can take over an hour, so it’s not a quick fix. Another cautious variable is using warm water. If you have access to a sink, you can run warm (not hot) water over the bottle. The critical protocol here is to avoid getting the temperature strip or the label wet, as that can damage them. You’re aiming for a slight, gradual increase. This is a high-anxiety maneuver, so if you have the time and privacy, it’s a potential loophole.
Scenario 2: The Lab Tech Seems Suspicious.
Maybe you fumbled the bottle, or they’re just having a stickler of a day. If you sense suspicion, the protocol is simple but hard: stay calm and polite. Do not delete extra information or offer excuses. Answer questions with short, direct responses. The collector’s job at the site is primarily to check the temperature and visual characteristics; they are not performing the lab validity tests. Their suspicion alone cannot confirm synthetic urine. If they insist on a direct observation due to suspicion, that’s a different, more complex procedure, but for a standard unsupervised test, your best defense is a calm demeanor that gives them no new reason to escalate.
Scenario 3: You Get an “Invalid” or “Diluted” Result.
This is where knowing your rights is crucial. An “invalid” result from the lab means something about the specimen’s characteristics—like pH or specific gravity—was so far outside normal human ranges that they couldn’t test it. A “diluted” result means your creatinine levels were low, often from drinking too much water. For DOT tests, if you receive a verified “invalid” or “diluted” result, you have the right to request a test of your split specimen within 72 hours. If that retest fails to confirm the original result, the entire test is canceled. This doesn’t mean you passed, but it means you didn’t fail, and your employer cannot treat it as a positive. This outcome often leads to an immediate retest. In that scenario, you’d need a new strategy, potentially exploring effective THC detox methods as a secondary backup to try and produce a clean, natural sample the second time around.
The core principle in any crisis is to avoid making a rash decision. Understand that the initial collection site is not the final word—the lab and the Medical Review Officer (MRO) process are where definitive judgments are made. Your job in the moment is to manage the immediate variables without drawing extra attention, and then address any formal results through the proper channels.
Pro Strategies: Reducing Anxiety and Ensuring Success with Drug Tests
All right, so you’ve got the kit, you’ve read the steps, but that knot in your stomach is still there. That’s the anxiety variable, and it’s a powerful one. It can make your hands shake, make you fumble, and make you look suspicious. These next strategies are about managing that variable—turning a high-stress scenario into a controlled procedure.
Building Muscle Memory: The Home Rehearsal
The single most effective thing you can do is practice the entire protocol at home, multiple times. Don’t just read the instructions. Actually, go through the motions: heat the bottle (using the method you’ll have access to on test day), attach the heating pad, secure it in your chosen concealment garment, and practice the quick, quiet pour. This does two critical things. First, it builds muscle memory. When you’re in the clinic bathroom with your heart pounding, your hands will know what to do even if your mind is racing. Second, it eliminates the unknown. You’ll know exactly how the cap feels, how the temperature strip reads, and how long the heat pad lasts. You’re estimating your own performance variables instead of guessing.
Situational Control: Clothing and Concealment
Your clothing choice is a major protocol decision. The goal is secure, body-heat-assisted concealment. Standard pockets are a high-risk location. Instead, consider specialized garments. Compression shorts or an athletic-style underwear with a secure pocket hold the sample firmly against your body, which helps maintain temperature and prevents shifting or audible sloshing. There are also dedicated synthetic urine belts (like the TestClear Privacy Belt or Clear Choice Incognito Belt) that use a gravity-fed tube—these can be very reliable if practiced with. The idea is to integrate the apparatus into your normal posture and movement, so there’s no awkward adjustment or tell-tale fidgeting.
The Psychological Edge: Visualization and Contingency Planning
Here’s a pro-tip used by athletes: visualize the process. Mentally walk through arriving at the site, waiting, being called back, entering the bathroom, and successfully completing your rehearsed steps. This mental rehearsal can significantly lower anticipatory anxiety. Furthermore, have a contingency plan. Know the employer’s or program’s retest policy. For DOT-regulated tests, remember you typically have 72 hours to request a split specimen retest if there’s a dispute. Understanding that a single result isn’t always the final word can reduce that paralyzing, all-or-nothing panic. It’s not about planning to fail; it’s about knowing the full procedure, which gives you a sense of control.
Remember, these strategies are about managing the human elements—stress and unpredictability—that the kit itself can’t control. By rehearsing, dressing smartly, and knowing your recourse, you’re addressing the anxiety variable directly, which is often the difference between a smooth submission and a compromised one.
Final Thoughts: Key Takeaways for a Successful Drug Test Experience
Alright, let’s bring this all together. The core of this whole guide is simple: your success isn’t about luck. It’s about control. Control over the variables you can manage, and using a tool designed to handle the rest. So, let’s lock in the absolute must-dos.
GET YOUR SUB SOLUTION URINEThe biggest mistakes, and their straightforward fixes, boil down to this:
- Temperature Failure: The sample is too hot or too cold at submission. The Fix: Use the heat activator powder for precise, last-minute adjustments to hit that 94-100°F window right before you pour.
- Getting Caught Concealing: A noisy bottle, a visible outline, or a failed hiding spot. The Fix: Practice your hiding method with the actual kit until it’s silent and invisible. Use a reliable stash leg belt or underwear with a dedicated pocket.
- Buying a Dud: Purchasing a counterfeit or expired kit from an unauthorized seller. The Fix: Only buy directly from the official Clear Choice website or their verified retailers. Check the seal and expiration date immediately.
- Invalid Result: The lab flags the sample’s pH, creatinine, or specific gravity. The Fix: Mix the powder only with the provided filtered water, exactly as instructed. Don’t add anything else.
Success comes from this meticulous preparation. You’re not just buying a product; you’re executing a procedure. By focusing on these critical points, you’re stacking the odds heavily in your favor. You now have the map to navigate this. Use it, trust the process, and move forward with confidence.